

- Криптографический арм на базе стандартов с открытым ключом. выпуск ssl-сертификатов. эпилог
- This article uses ubuntu 16.04 this distro reached end of life (eol) on apr 2021.
- Introduction
- Prerequisites
- Step 1: create the ssl certificate
- Step 2: configure nginx to use ssl
- Create a configuration snippet pointing to the ssl key and certificate
- Create a configuration snippet with strong encryption settings
- Adjust the nginx configuration to use ssl
- (alternative configuration) allow both http and https traffic
- Step 3: adjust the firewall
- Step 4: enable the changes in nginx
- Step 5: test encryption
- Step 6: change to a permanent redirect
- Conclusion
Криптографический арм на базе стандартов с открытым ключом. выпуск ssl-сертификатов. эпилог
Вот мы и
добрались
до создания самоподписанных сертификатов.
Где применяются самоподписанные сертификаты? Конечно, с самоподписанным сертификатом вы не сможете зарегистрироваться на сайте Госуслуг или подать подписанную декларацию в ФНС. Но для внутрикорпоративного документооборота их вполне можно использовать. Можно также использовать их для защиты личной почтовой переписки, в VPN-сетях и т.п. Но наиболее часто используют самоподписанные SSL-сертификаты для обеспечения защищенного доступа по https-протоколу к Web-приложениям. Самым популярным средством для создания самоподписанных сертификатов остается
OpenSSL
. Процедура получения SSL-сертификатов с помощью того же OpenSSL хороша описана
здесь
. Но там вы не найдете упоминая о ГОСТ-овых сертификатах, о токенах
PKCS#11
и т.п. Здесь мы рассмотрим простой графический интерфейс, который позволяет получать сертификаты на базе ГОСТ Р 34.10-2021 и без всякого использования OpenSSL.
Итак, нажимаем кнопку «Самоподписанный сертификат»:

Как видим, эта вкладка мало чем отличается от аналогичной вкладки при создании запроса на сертификат. Здесь появились кнопки выбора типа генерируемого сертификата «Тип сертификата»:
— пользовательский сертификат (кнопка User);
— корневой сертификат (кнопка CA);
— SSL-сертификат (кнопка SSL).
Естественно, начинать работу надо с выпуска корневого сертификата, на базе которого затем будут выпускаться все остальные сертификаты. При создании корневого сертификата не забудьте включить флажок «Подпись сертификата» в назначении (использование) ключа:

Опускаем заполнение основных полей сертификата, они ничем не отличаются от заполнения аналогичных полей для запроса, а сразу переходим к завершающим страницам. Вот первая из них:
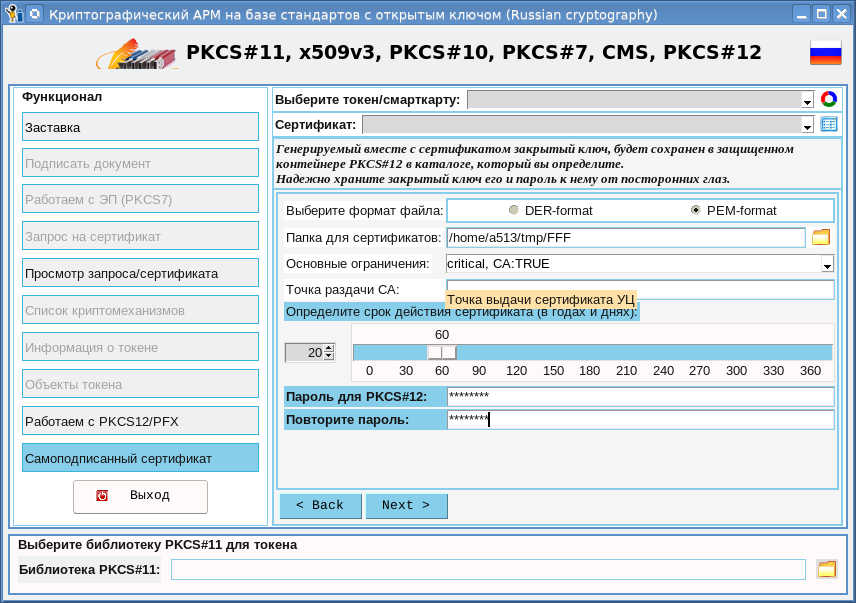
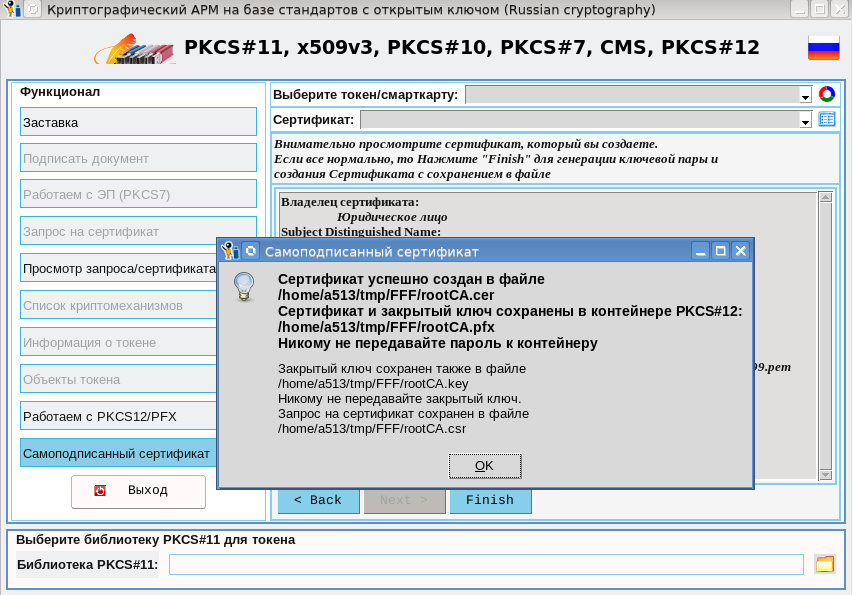
На этой странице необходимо выбрать папку, в которой будет сохранен корневой сертификат и его закрытый ключ. Именно эту папку затем необходимо будет указывать при выпуске других сертификатов. Необходимо также определить срок действия сертификата. Можно задать также точку, в которой можно будет получить корневой сертификат. При выпуске сертификат и закрытый ключ будут упакованы в так многими любимый защищенный контейнер PKCS#12. В связи с этим необходимо задать пароль для контейнера. В итоге, после нажатия кнопки «Finish», будет получен корневой сертификат:
При выпуске сертификата мы получаем четыре файла в указанном каталоге:
Файл rootCA.key, если вы не собираетесь его использовать, лучше сразу уничтожить. В противном случае храните его в месте, недоступном другим людям. Также скрывайте от посторонних глаз пароль к контейнеру rooCA.pfx.
Теперь, когда мы имеем корневой сертификат, можно приступить к выпуску пользовательских сертификатов, включая SSL-сертификаты:
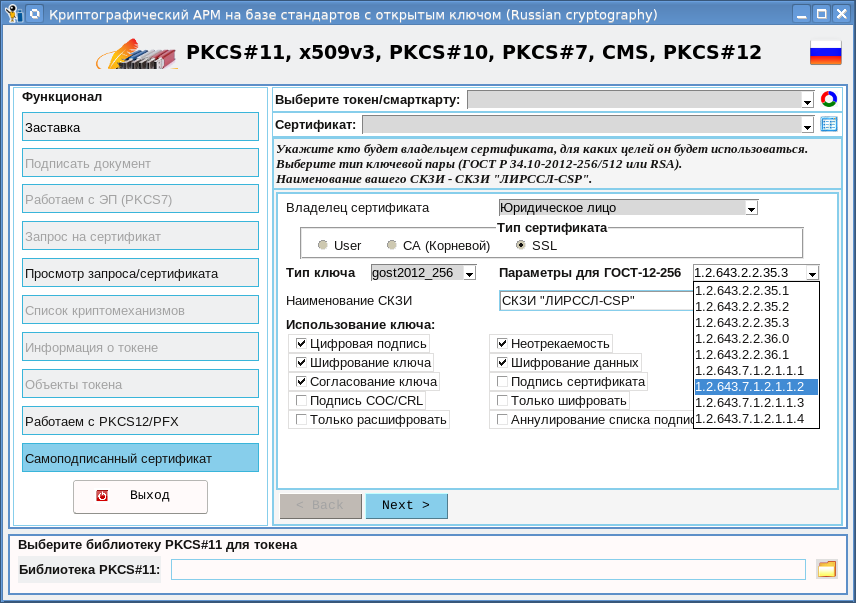
После выбора типа сертификата (SSL-сертификат), типа ключа, его параметров и как он (ключ) будет использоваться, переходим к следующей странице:
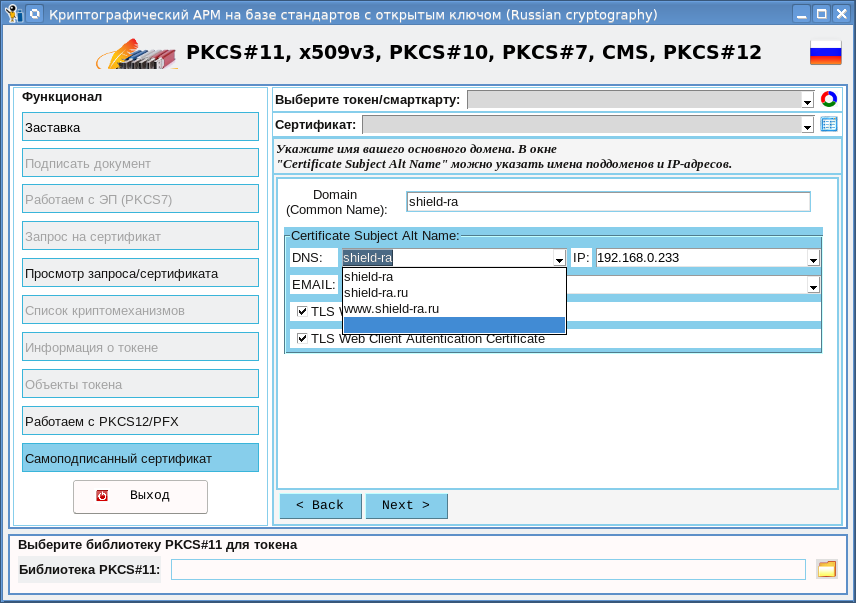
На этой странице задается основное имя домена, которое будет занесено в поле Common Name, а также можно задать дополнительные (альтернативные ) имена вашего домена. Также можно прописать IP-адреса, где может располагаться ваш домен. Все это делается ради “вожделенного зеленого замочка“.
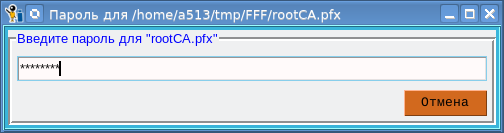
Разобравшись с доменами, IP-адресами переходим к следующим вкладкам. Там все как обычно. Единственное отличие состоит в том, что после нажатия кнопки «Finish» будет затребован пароль к корневому контейнеру rootCA.pfx:
После успешного ввода пароля также получим четыре файла:
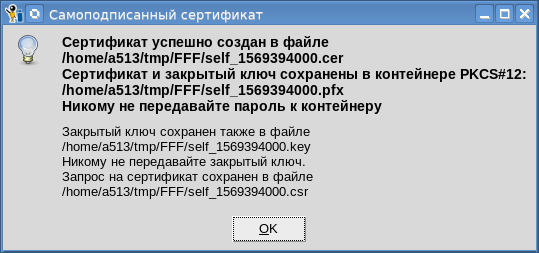
Все замечания, касающиеся пароля и закрытого ключа, высказанные выше применительно к корневому сертификату, относятся и к остальным сертификатом. Все сертификаты мы выпустили. Что дальше?
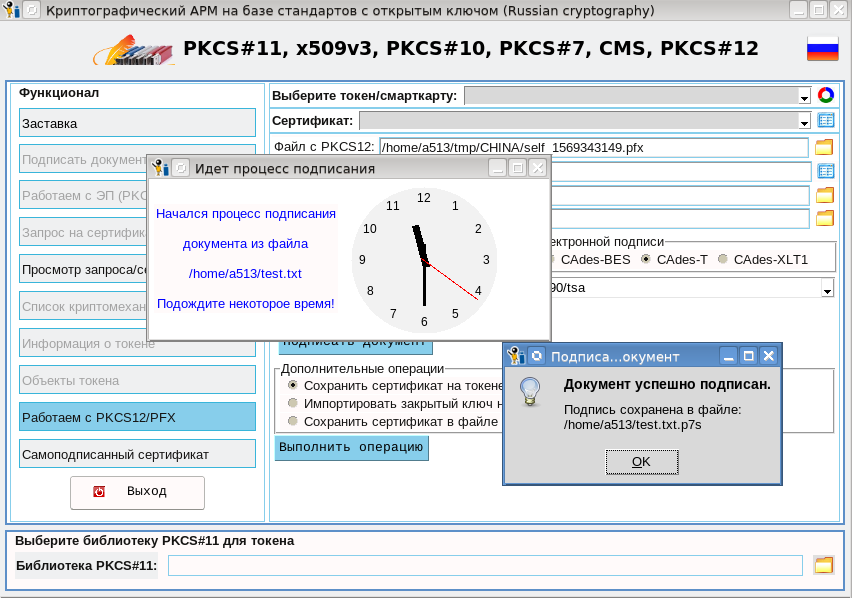
Использовать их. Если это пользовательские сертификаты, то вы их можете использовать в этой же утилите через контейнеры PKCS#12, в документообороте для подписания документов, например:
Что касается SSL-сертификатов, то их надо использовать по назначению для организации защищенного канала с Web-приложением. В качестве такого приложения мы взяли УЦ, на котором доступ к его ресурсам для администраторов организован по ГОСТ-вому https. УЦ развернуто на базе Apache2-2.4.10 с модулем mod_ssl, который поддерживает российские шифрсьюты. На сервере (у нас это Linux) кладем полученный SSL-сертификат (<ваш каталог>/self_xxx.cer) и его закрытый ключ (<ваш каталог>/sel_xxx.key) в папку /etc/ssl и прописываем пути к ним в файле /etc/apache2/sites-available/default-ssl:
...
SSLCertificateFile <ваш каталог>/self_xxx.cer
SSLCertificateKeyFile <ваш каталог>/self_xxx.key
....
Перезапускаем apache2:
#service pache2 restart
#
На рабочем месте (у меня это Linux) в
браузере с поддержкой российской криптографии
устанавливаем наш корневой сертификат (/rootCA.cer) с указанием доверия к нему. На рабочем компьютере в файл /etc/hosts добавляем следующую строку:
192.168.0.233 www.shield-ra.ru shield-ra.ru shield-raи идем по одному из этих адресов:
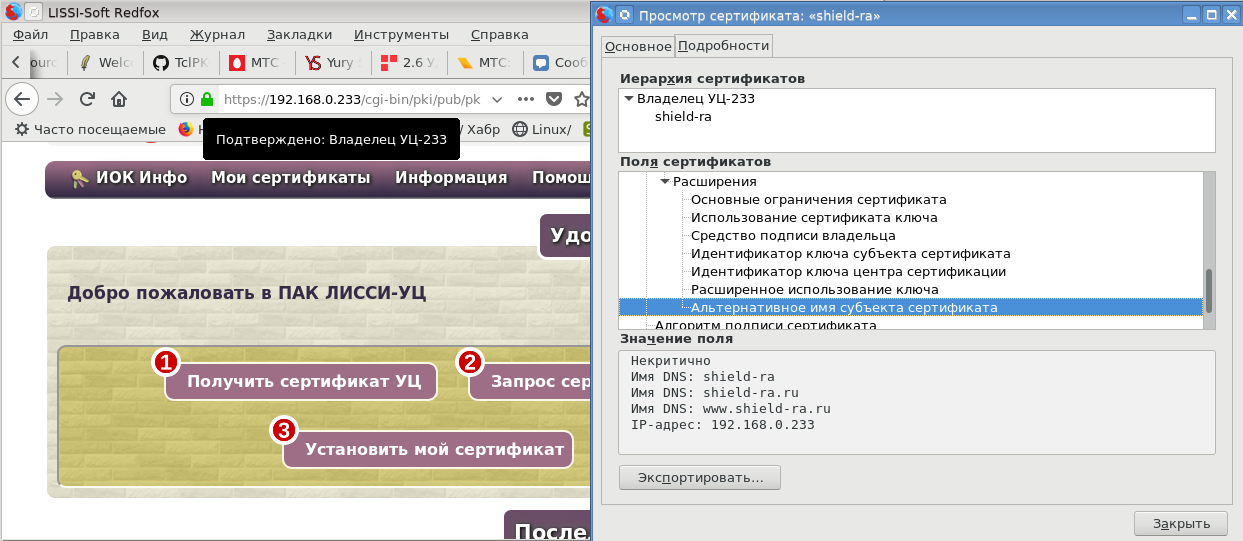
Горит, горит «вожделенный зеленый замочек».
Проверим и остальные адреса:
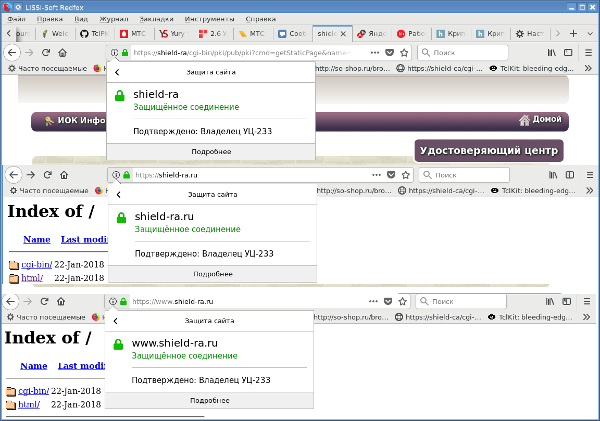
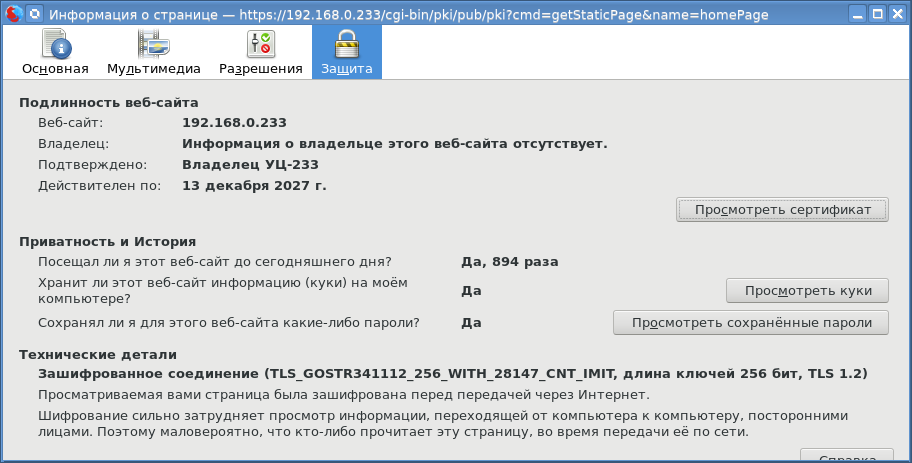
Зелено вокруг. И наконец, посмотрим какой шифрсьют мы задействовали:
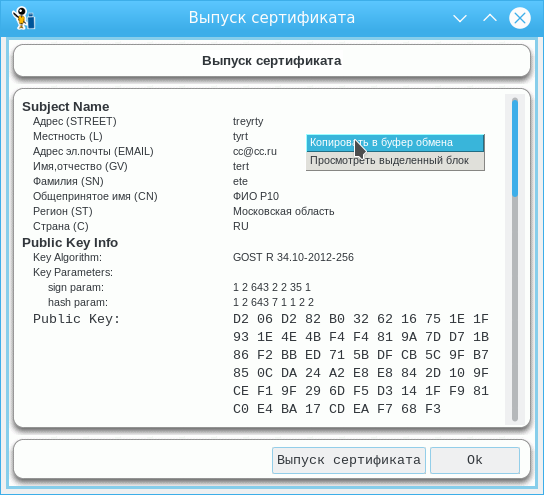
Для создания самоподписанных сертификатов по созданным ранее запросам на сертификат расширен функционал страницы «Просмотр запроса/сертификата»:
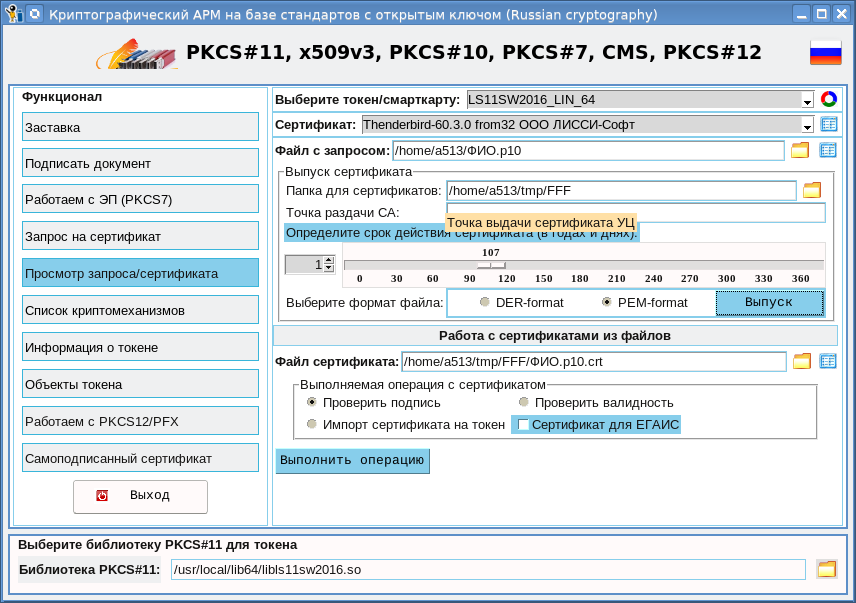
Как видно из скриншота, теперь можно не только просмотреть запрос, но и выдать по нему сертификат. В качестве корневого сертификата используется все тот же контейнер rootCA.pfx. При нажатии кнопки «Выпуск» появится окно с запросом, просмотрев который вы можете нажать кнопку «Выпуск сертификата»:
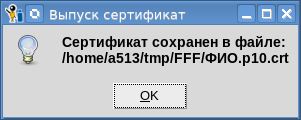
После нажатия кнопки будет запрошен пароль к корневому контейнеру и в итоге выпущен сертификат:
Кстати, просмотреть полученный сертификат можно на этой же странице (кнопка «Файл сертификата»).
Итак, наша криптографическая утилита cryptoarmpkcs позволяет:
— работать с токенами PKCS#11 с поддержкой российской криптографии;
— создавать запросы на сертификаты;
— создавать и проверять электронную подпись (вплоть до CAdes XLT1) с использованием токенов PKCS#11;
— создавать электронную подпись (вплоть до CAdes XLT1) с использованием контейнеров PKCS#12;
— выпускать самоподписанные сертификаты;
— просматривать сертификаты и запросы.
Наверное, что-то в ней не хватает, подскажите, учтем. Спасибо за долготерпение.
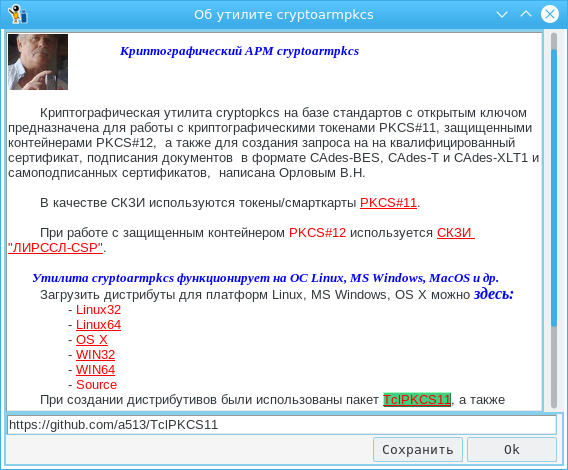
P.S. Теперь загружать обновленные версии можно непосредственно из утилиты. Для этого достаточно подвести курсор мыши на заголовок «PKCS#11, X509v3 …», нажать правую клавишу мыши и выбрать пункт меню «О программе»:
This article uses ubuntu 16.04
this distro reached end of life (eol) on apr 2021.
Introduction
TLS, or transport layer security, and its predecessor SSL, which stands for secure sockets layer, are web protocols used to wrap normal traffic in a protected, encrypted wrapper.
Using this technology, servers can send traffic safely between the server and clients without the possibility of the messages being intercepted by outside parties. The certificate system also assists users in verifying the identity of the sites that they are connecting with.
In this guide, we will show you how to set up a self-signed SSL certificate for use with an Nginx web server on an Ubuntu 16.04 server.
Note: A self-signed certificate will encrypt communication between your server and any clients. However, because it is not signed by any of the trusted certificate authorities included with web browsers, users cannot use the certificate to validate the identity of your server automatically.
A self-signed certificate may be appropriate if you do not have a domain name associated with your server and for instances where the encrypted web interface is not user-facing. If you do have a domain name, in many cases it is better to use a CA-signed certificate. You can find out how to set up a free trusted certificate with the Let’s Encrypt project here.
Prerequisites
Before you begin, you should have a non-root user configured with sudo privileges. You can learn how to set up such a user account by following our initial server setup for Ubuntu 16.04.
You will also need to have the Nginx web server installed. If you would like to install an entire LEMP (Linux, Nginx, MySQL, PHP) stack on your server, you can follow our guide on setting up LEMP on Ubuntu 16.04.
If you just want the Nginx web server, you can instead follow our guide on installing Nginx on Ubuntu 16.04.
When you have completed the prerequisites, continue below.
Step 1: create the ssl certificate
TLS/SSL works by using a combination of a public certificate and a private key. The SSL key is kept secret on the server. It is used to encrypt content sent to clients. The SSL certificate is publicly shared with anyone requesting the content. It can be used to decrypt the content signed by the associated SSL key.
We can create a self-signed key and certificate pair with OpenSSL in a single command:
You will be asked a series of questions. Before we go over that, let’s take a look at what is happening in the command we are issuing:
As we stated above, these options will create both a key file and a certificate. We will be asked a few questions about our server in order to embed the information correctly in the certificate.
Fill out the prompts appropriately. The most important line is the one that requests the Common Name (e.g. server FQDN or YOUR name). You need to enter the domain name associated with your server or, more likely, your server’s public IP address.
The entirety of the prompts will look something like this:
Output
Country Name (2 letter code) [AU]:US
State or Province Name (full name) [Some-State]:New York
Locality Name (eg, city) []:New York City
Organization Name (eg, company) [Internet Widgits Pty Ltd]:Bouncy Castles, Inc.
Organizational Unit Name (eg, section) []:Ministry of Water Slides
Common Name (e.g. server FQDN or YOUR name) []:server_IP_address
Email Address []:admin@your_domain.comBoth of the files you created will be placed in the appropriate subdirectories of the /etc/ssl directory.
While we are using OpenSSL, we should also create a strong Diffie-Hellman group, which is used in negotiating Perfect Forward Secrecy with clients.
We can do this by typing:
This may take a few minutes, but when it’s done you will have a strong DH group at /etc/ssl/certs/dhparam.pem that we can use in our configuration.
Step 2: configure nginx to use ssl
We have created our key and certificate files under the /etc/ssl directory. Now we just need to modify our Nginx configuration to take advantage of these.
We will make a few adjustments to our configuration.
- We will create a configuration snippet containing our SSL key and certificate file locations.
- We will create a configuration snippet containing strong SSL settings that can be used with any certificates in the future.
- We will adjust our Nginx server blocks to handle SSL requests and use the two snippets above.
This method of configuring Nginx will allow us to keep clean server blocks and put common configuration segments into reusable modules.
Create a configuration snippet pointing to the ssl key and certificate
First, let’s create a new Nginx configuration snippet in the /etc/nginx/snippets directory.
To properly distinguish the purpose of this file, let’s call it self-signed.conf:
Within this file, we just need to set the ssl_certificate directive to our certificate file and the ssl_certificate_key to the associated key. In our case, this will look like this:
/etc/nginx/snippets/self-signed.conf
ssl_certificate /etc/ssl/certs/nginx-selfsigned.crt;
ssl_certificate_key /etc/ssl/private/nginx-selfsigned.key;
When you’ve added those lines, save and close the file.
Create a configuration snippet with strong encryption settings
Next, we will create another snippet that will define some SSL settings. This will set Nginx up with a strong SSL cipher suite and enable some advanced features that will help keep our server secure.
The parameters we will set can be reused in future Nginx configurations, so we will give the file a generic name:
To set up Nginx SSL securely, we will be using the recommendations by Remy van Elst on the Cipherli.st site. This site is designed to provide easy-to-consume encryption settings for popular software. You can read more about his decisions regarding the Nginx choices here.
The suggested settings on the site linked to above offer strong security. Sometimes, this comes at the cost of greater client compatibility. If you need to support older clients, there is an alternative list that can be accessed by clicking the link on the page labelled “Yes, give me a ciphersuite that works with legacy / old software.” That list can be substituted for the items copied below.
The choice of which config you use will depend largely on what you need to support. They both will provide great security.
For our purposes, we can copy the provided settings in their entirety. We just need to make a few small modifications.
First, we will add our preferred DNS resolver for upstream requests. We will use Google’s for this guide. We will also go ahead and set the ssl_dhparam setting to point to the Diffie-Hellman file we generated earlier.
Finally, you should take take a moment to read up on HTTP Strict Transport Security, or HSTS, and specifically about the “preload” functionality. Preloading HSTS provides increased security, but can have far reaching consequences if accidentally enabled or enabled incorrectly. In this guide, we will not preload the settings, but you can modify that if you are sure you understand the implications:
/etc/nginx/snippets/ssl-params.conf
# from https://cipherli.st/
# and https://raymii.org/s/tutorials/Strong_SSL_Security_On_nginx.html

ssl_protocols TLSv1 TLSv1.1 TLSv1.2;
ssl_prefer_server_ciphers on;
ssl_ciphers "EECDH AESGCM:EDH AESGCM:AES256 EECDH:AES256 EDH";
ssl_ecdh_curve secp384r1;
ssl_session_cache shared:SSL:10m;
ssl_session_tickets off;
ssl_stapling on;
ssl_stapling_verify on;
resolver 8.8.8.8 8.8.4.4 valid=300s;
resolver_timeout 5s;
# Disable preloading HSTS for now.  You can use the commented out header line that includes# the "preload" directive if you understand the implications.#add_header Strict-Transport-Security "max-age=63072000; includeSubdomains; preload";
add_header Strict-Transport-Security "max-age=63072000; includeSubdomains";
add_header X-Frame-Options DENY;
add_header X-Content-Type-Options nosniff;

ssl_dhparam /etc/ssl/certs/dhparam.pem;
Because we are using a self-signed certificate, the SSL stapling will not be used. Nginx will simply output a warning, disable stapling for our self-signed cert, and continue to operate correctly.
Save and close the file when you are finished.
Adjust the nginx configuration to use ssl
Now that we have our snippets, we can adjust our Nginx configuration to enable SSL.
We will assume in this guide that you are using the default server block file in the /etc/nginx/sites-available directory. If you are using a different server block file, substitute it’s name in the below commands.
Before we go any further, let’s back up our current server block file:
Now, open the server block file to make adjustments:
Inside, your server block probably begins like this:
/etc/nginx/sites-available/default
server {
    listen 80 default_server;
    listen [::]:80 default_server;

    # SSL configuration

    # listen 443 ssl default_server;
    # listen [::]:443 ssl default_server;

    . . .
We will be modifying this configuration so that unencrypted HTTP requests are automatically redirected to encrypted HTTPS. This offers the best security for our sites. If you want to allow both HTTP and HTTPS traffic, use the alternative configuration that follows.
We will be splitting the configuration into two separate blocks. After the two first listen directives, we will add a server_name directive, set to your server’s domain name or, more likely, IP address. We will then set up a redirect to the second server block we will be creating. Afterwards, we will close this short block:
Note: We will use a 302 redirect until we have verified that everything is working properly. Afterwards, we can change this to a permanent 301 redirect.
/etc/nginx/sites-available/default
server {
    listen 80 default_server;
    listen [::]:80 default_server;
    server_name server_domain_or_IP;return 302 https://$server_name$request_uri;}

    # SSL configuration

    # listen 443 ssl default_server;
    # listen [::]:443 ssl default_server;

    . . .
Next, we need to start a new server block directly below to contain the remaining configuration. We can uncomment the two listen directives that use port 443. We can add http2 to these lines in order to enable HTTP/2 within this block. Afterwards, we just need to include the two snippet files we set up:
Note: You may only have onelisten directive that includes the default_server modifier for each IP version and port combination. If you have other server blocks enabled for these ports that have default_server set, you must remove the modifier from one of the blocks.
/etc/nginx/sites-available/default
server {
    listen 80 default_server;
    listen [::]:80 default_server;
    server_name server_domain_or_IP;
    return 302 https://$server_name$request_uri;
}

server {

    # SSL configuration

    listen 443 ssl http2 default_server;listen [::]:443 ssl http2 default_server;include snippets/self-signed.conf;include snippets/ssl-params.conf;

    . . .
Save and close the file when you are finished.
(alternative configuration) allow both http and https traffic
If you want or need to allow both encrypted and unencrypted content, you will have to configure Nginx a bit differently. This is generally not recommended if it can be avoided, but in some situations it may be necessary. Basically, we just compress the two separate server blocks into one block and remove the redirect:
/etc/nginx/sites-available/default
server {
    listen 80 default_server;
    listen [::]:80 default_server;
    listen 443 ssl http2 default_server;listen [::]:443 ssl http2 default_server;

    server_name server_domain_or_IP;
    include snippets/self-signed.conf;include snippets/ssl-params.conf;

    . . .
Save and close the file when you are finished.
Step 3: adjust the firewall
If you have the ufw firewall enabled, as recommended by the prerequisite guides, you’ll need to adjust the settings to allow for SSL traffic. Luckily, Nginx registers a few profiles with ufw upon installation.
We can see the available profiles by typing:
You should see a list like this:
Output
Available applications:
Nginx Full
Nginx HTTP
Nginx HTTPS
OpenSSH
You can see the current setting by typing:
It will probably look like this, meaning that only HTTP traffic is allowed to the web server:
Output
Status: active
To Action From
-- ------ ----
OpenSSH ALLOW Anywhere
Nginx HTTP ALLOW Anywhere
OpenSSH (v6) ALLOW Anywhere (v6)
Nginx HTTP (v6) ALLOW Anywhere (v6)
To additionally let in HTTPS traffic, we can allow the “Nginx Full” profile and then delete the redundant “Nginx HTTP” profile allowance:
Your status should look like this now:
Output
Status: active
To Action From
-- ------ ----
OpenSSH ALLOW Anywhere
Nginx Full ALLOW Anywhere
OpenSSH (v6) ALLOW Anywhere (v6)
Nginx Full (v6) ALLOW Anywhere (v6)
Step 4: enable the changes in nginx
Now that we’ve made our changes and adjusted our firewall, we can restart Nginx to implement our new changes.
First, we should check to make sure that there are no syntax errors in our files. We can do this by typing:
If everything is successful, you will get a result that looks like this:
Output
nginx: [warn] "ssl_stapling" ignored, issuer certificate not found
nginx: the configuration file /etc/nginx/nginx.conf syntax is ok
nginx: configuration file /etc/nginx/nginx.conf test is successful
Notice the warning in the beginning. As noted earlier, this particular setting throws a warning since our self-signed certificate can’t use SSL stapling. This is expected and our server can still encrypt connections correctly.
If your output matches the above, your configuration file has no syntax errors. We can safely restart Nginx to implement our changes:
Step 5: test encryption
Now, we’re ready to test our SSL server.
Open your web browser and type https:// followed by your server’s domain name or IP into the address bar:
https://server_domain_or_IPBecause the certificate we created isn’t signed by one of your browser’s trusted certificate authorities, you will likely see a scary looking warning like the one below:
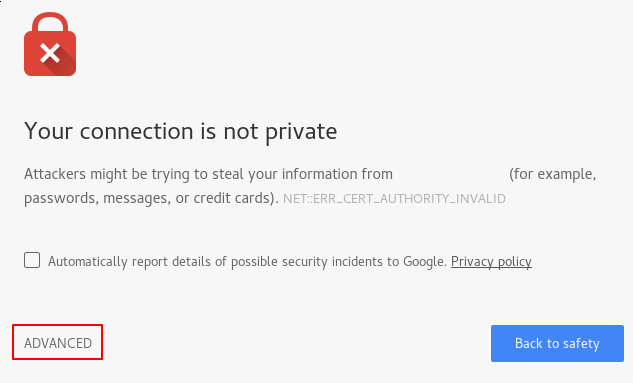
This is expected and normal. We are only interested in the encryption aspect of our certificate, not the third party validation of our host’s authenticity. Click “ADVANCED” and then the link provided to proceed to your host anyways:
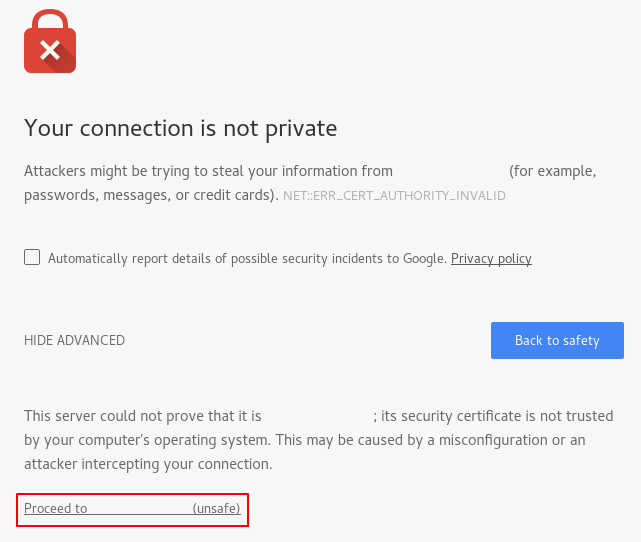
You should be taken to your site. If you look in the browser address bar, you will see a lock with an “x” over it. In this case, this just means that the certificate cannot be validated. It is still encrypting your connection.
If you configured Nginx with two server blocks, automatically redirecting HTTP content to HTTPS, you can also check whether the redirect functions correctly:
http://server_domain_or_IPIf this results in the same icon, this means that your redirect worked correctly.
Step 6: change to a permanent redirect
If your redirect worked correctly and you are sure you want to allow only encrypted traffic, you should modify the Nginx configuration to make the redirect permanent.
Open your server block configuration file again:
Find the return 302 and change it to return 301:
/etc/nginx/sites-available/default
server {
    listen 80 default_server;
    listen [::]:80 default_server;
    server_name server_domain_or_IP;
    return 301 https://$server_name$request_uri;
}

. . .
Save and close the file.
Check your configuration for syntax errors:
When you’re ready, restart Nginx to make the redirect permanent:
Conclusion
You have configured your Nginx server to use strong encryption for client connections. This will allow you serve requests securely, and will prevent outside parties from reading your traffic.